Photoshop Plastic Font
Step 1
Open a new file in Adobe Photoshop with the
following settings.

Step 2
Select Type Tool (T) and in the Option Bar
select Arial Black, 325 pt, smooth. Then type the word "psd" in lower
case.

Step 3
Change the tool into Move Tool (V). Then in
the Layer palette left click on background layer to target that layer. Now
press shift from the keyboard and left click on the Type layer. Alignment
buttons will be active in the Option bar when more than one layer is selected.
Then click on the Vertical Centers and Horizontal Centers buttons to center
align the type layer.

Step 4
Create a new layer by clicking on the Create a
new layer button below the Layer palette and fill it with white color. Target
both the new layer and the type layer by using the shift click method. Then use
Menu > Layer > Merge Layers to merge them into a single layer.

Step 5
For creating a reflective glossy plastic text
effect we need a bold or chunky round corner type face. Because round edges
catch more light than the corner edge. But edges of Arial Black are corner not
round. So let's explore a quick and easy technique to change any edge from
corner to round. First on "psd" layer apply Filters > Blur >
Gaussian Blur (Radius: 8 px).

Step 6
Then on the same layer Image > Adjustments
> Levels. In the Input Levels area drag the Left (Shadow) Input Slider to
the right and the Right (Highlight) Input Slider to the right. This will remove
or rather convert the resulting grey blurry area produced by the application of
Gaussian Blur and change that area into solid black. Due to that the corner
edges are now rounded.

Step 7
Select the Magic Wand Tool (W) and click on
the black area of the "psd" layer to select the black text. Selection
active, create a new blank layer on top of the "psd" layer by
clicking on the Create a New Layer button below the Layer Palette. Then fill
the selection with 50% gray and also rename the layer as "base
style". Deselect by Select > Deselect or press Ctrl + D.

Step 8
You can delete the "psd" layer as we
don't need it anymore. Double click on the Background layer to convert it to a
normal layer (Layer 0). Now double click on the text "Layer 0" and
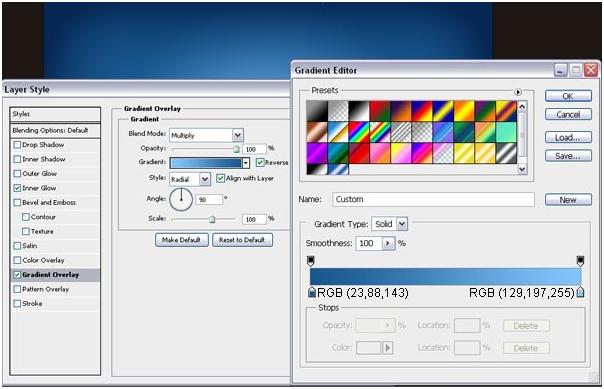
rename it to "gradient bg". Then double click on the "gradient
bg" layer to open the Layer Style dialogue box. First create a Radial
gradient in the Gradient Overlay with the following settings.
Step 9
Then create an Inner Glow with the following
settings. This will create a texture variation of the Gradient Overlay.

Step 10
Target the "base style" layer.
Double click on it to open the Layer Style dialogue box. Let's start building
the main Plastic Layer Style. First in the Blending Option section, reduce the
Fill Opacity to 0%. This will make the Plastic Style transparent.

Step 11
Then for the Bevel and Emboss section use
settings from the below screenshot. In the Shading section, for Highlight Mode
select Linear Dodge for a much stronger highlight than Screen blending mode.
Also for the Shadow Mode use Color Dodge to simulate at the edge of the text
light is passing through a translucent object bright look. Below the Bevel and
Emboss is the Contour of Bevel and Emboss, which will basically define the edge
or shoulder of the Bevel. Click on the Contour type and select Gaussian type.

Step 12
Inner Glow settings. Notice that Darken as the
Blend Mode to produce a darker color blend.

Step 13
Outer Glow settings. Blend Mode is Darker
Color to produce a partial darker color blend.

Step 14
Inner Shadow settings. Here Blend Mode is Multiply
to produce a very dark outer edge.

Step 15
Drop Shadow settings. Drop Shadow is not
creating shadow here. But to create the bright light is passing from the edges
of a translucent object.

Step 16
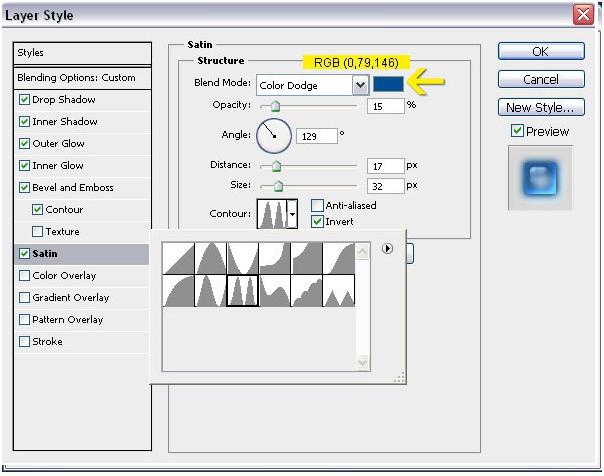
Satin settings for creating bright surface reflections.
Color Dodge as a Blend Mode is helping to do that. In the contour use Ring –
Double for lots of light reflections but for subtlety reduce the Opacity below
the Blend Mode to 15%.
Step 17
After finishing the basic Plastic style.

Step 18
Right click on the "base style"
layer and choose Duplicate Layer. Rename the duplicate layer as "secondary
highlights". Double click on the layer to open Layer Style dialogue box
and uncheck everything besides Bevel and Emboss and Satin. Match below settings.

Step 19
Now click on the Satin Style and use settings
from below. Contour is Ring – Double, but this time with much higher opacity.

Step 20
This is after finishing "secondary
highlights" layer.

Step 21
Duplicate the "secondary highlights"
layer and rename into "primary highlights". Double click on the layer
to open the Layer Style dialogue box. In The Bevel and Emboss match the
settings from below.

Step 22
Drop Shadow settings. This is to boost the
light passing from the edge look more.

Step 23
This is after finishing the "primary
highlights" layer.

Step 24
The Plastic style is complete now. But let's
tweak it little more. Target the "primary highlights" layer and press
Ctrl + Shift + Alt + E to create a copy merged layer on top of it. Rename it to
"upper reflections". Duplicate the layer and rename it to
"surface reflections". Drag or reposition the "surface
reflections" layer below the "base layer". Reduce the opacity of
the "surface reflections" layer to 20%. Now target the "upper
reflections" layer to 10% and change the blend mode to Multiply. Below is
the result.

Step 25
Create a new layer with the name
"glow" on top of "upper reflections" layer and with a soft
brush and white color spots (glow) on top of the highlight areas. Reduce the
opacity to 50%. While working with the Brush tool if you press Alt button, the
Brush tool will temporary change into Eyedropper tool. With that temporary
Eyedropper toll mode select bright blue colors from the highlight areas
directly and paint some bright blue spots also. Reduce the "glow"
layer opacity to 50%. Here's the image with the layers after finishing the glow
painting.

Step 26
Create a Curve Adjustment Layer by clicking on
the fourth button from left below the Layers Palette. In the Curve window
create s-curve or contrast curve to adjust the overall contrast.

Step 27
Now target the "glow" layer and
reduce the opacity to 20%. Duplicate the "glow" layer and rename
"glow 2". Move the layer to top and change the opacity to 40%.
Congratulation, Transparent Plastic Effect is now complete.

Ffinal Results

No comments:
Post a Comment